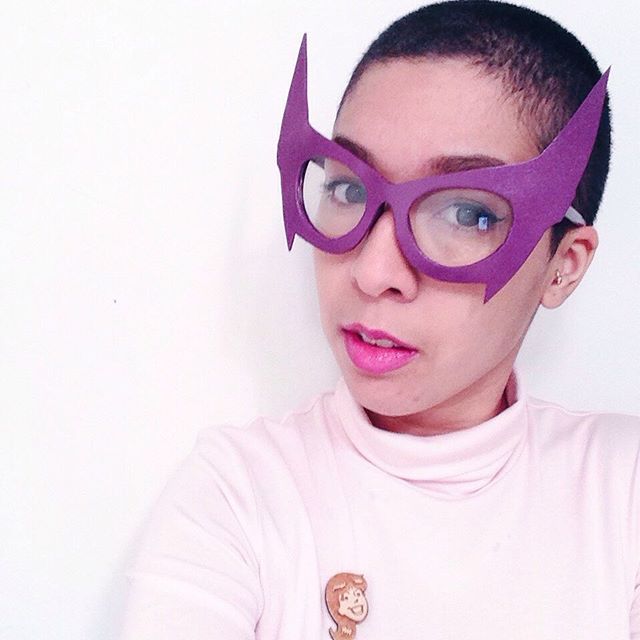
Cosplay Crafting: How to Make Tinted Glasses With Just $15 and 1 Hour
This one is for all the Bombshell Huntress fans.

I don’t know about you, but I’m guilty of postponing my cosplay progress just to avoid complicated tasks. Too hard? Maybe tomorrow. I’ve been planning to make my Bombshell Huntress glasses since NYCC in October, but only got around to it now, and you know what? There was no need for the delay because it was SUPER EASY.
Don’t make the mistake I made! If you’re making a similar pair of glasses that requires making the frame or tinting lens, take my hand, and I’ll show you the cheapest and fastest way.
What you’ll need:
- Craft foam, $1
- A pair of glasses, $8
- Scissors
- Paper
- X-acto knife
- Pen and/or pencil
- Colored plastic $1
- Floral spray paint ,$4 on sale
Not pictured: Glue Gun and masking tape. (Oops!)
Step 1: Make your pattern! I enlarged the image of the cover to fit the size of my glasses and printed it out. After placing it against the glasses, I made a few edits and made a new pattern on thick crafting paper.
Note: If you are uber talented—like I know you are—you can freehand the frame instead!
Step 2: Fold your craft foam in half (hot dog style), place your pattern on the fold, and trace.
Step 3: Using your scissors, carefully cut along the outside lines. Use your X-acto knife for any little details you can’t reach!
Step 4: To reach the lens, make an “X” with your exacto knife to make quadrants to make the cut more smooth.
Step 5: Unfold the craft foam to reveal your work. Admire it. Then place it against your glasses to see if it is a good fit..
Step 6: Take your colored plastic, (I used a blinder pocket from Staples because I couldn’t find a sheet, but it works just as well) and cut aquare pieces for your lens!
Step 7: To accurately cut your lens, apply masking tape to use it as a pattern. After positioning it, use your X-acto knife to carefully cute amount the lens. Do not—do not do not do not—cut the lens. Place your knife on the inside corners where the lens and plastic meet.
Step 8: After making your pattern, peel the tape and place it on your colored plastic. I cut mine a bit smaller to make space so I can remove the plastic whenever I want, since I need to wear actual glasses.
Step 9: Cut around the tape, and ta-da! you have your lens! Repeat to make your second lens.
Step 10: Place your lens pieces into your glasses to confirm they’re a good fit!
A lot of people in my last tutorial were curious as to why I used floral spray paint for my shoes instead of leather paint and one of the reasons was for this! Floral paint adheres to several textures including plastic, so now my all my Bombshell Huntress accessories match!
Step 11: Paint your glasses frames, if necessary. I had already painted my glasses beforehand (oops!), but if you follow the directions on the can, you’ll be able to knock it out. Remember: tape off your lenses.
Step 12: Paint your craft foam piece! After applying as many coats as necessary (I applied about 5), let it dry.
Step 13: Attach your piece to your glasses! I used hot glue to avoid the toxicity and odor of stronger glues—it works just as well! Apply a thin, even coat to avoid bumps, and you’re done!
Like always, all that’s left to do is take lots of selfies with your new project! Be sure to tag @themarysue and me, @thecrazybatlady! We’d love to see how it comes out! If you have any tips for fellow readers, leave them in the comments below.
Jessica is a pink-clad brat-girl, blogger, and craftswoman headquartered in NYC. You can find her collection of adventures in beauty, cosplay and more of her tutorials over at her blog, The Crazy Bat Lady.
—Please make note of The Mary Sue’s general comment policy.—
Do you follow The Mary Sue on Twitter, Facebook, Tumblr, Pinterest, & Google +?
Have a tip we should know? tips@themarysue.com